
Oh yes, it's true, I finally took the plunge and bought the new Meguiars G220 V2 Professional Dual Action Polisher!
Although I have a horrible cold, I decided to take advantage of the situation and do this Review")
What you get/What I bought
Prices vary from place to place, but what you get with the G220 V2 standard is a nice Canvas bag, Backing Plate including all the bolts and tools you need to get assembling (which is very easy to do!, literally 2 bolts for the handle)
I bought mine with the extra Cutting, Polishing and Finishing Soft Buff 2.0, 7" pads (pictured below) which were around £10 each.

What you need
Now you are going to need some cleaning products, if you are a Meguiars Whore (like myself) you are going to have some Ultimate Compound and Ultimate/NXT 2.0 Liquid Wax, if not, you need to go out and get some! Obviously you can use any other branded product with this polisher and even the professional range of cleaners/waxes (if you have otherwise)
Also use some Quick Detailer to 'prime' the pads, I explain that later... (I used speed detailer) oh and some clean microfibers to wipe the products off.


How it all works
Basically, what you are doing with a machine polisher is making things easier, that and removing defects which otherwise would be near impossible by hand. The G220 V2 is dual action, so it rotates and orbits. What this means is you have less chance of scratching your paint surface. It also has Cruise Control, a feature the DC5 could have done with :lol:
It also has variable speeds which you will need depending on the level of polishing you are doing.
The Polishing/Cutting/Finishing pads have a velcro backing, so it's really easy to apply and remove on the G220 V2's velcro backing plate, just line them up and press down. Simples!
You use the 'Dead Weight' of the machine to do the polishing, in other words, you don't need to add pressure, unless you are working vertically obviously, in which case you need just enough to keep it straight against the panel.
Handling/First Impressions
The G220 V2 isn't what I call 'light', it weighs about 6 Pounds, so it's a hefty piece of kit IMO, but very easy to hold and control with the supplied handle and the overall shape of the machine feels comfortable plus that 'dead weight' actually helps it work, thus saving you effort.
I thought it was quite loud! but then I don't like overly loud noises (I have a Kakimoto 06&R don't you know!) :lol: I would say the G220 V2 was about the volume of a small electric lawnmower on speed 4 against my test bonnet I used, speed 6 actually scared me :lol: (VTEC YO!)
Really though, you will only need between speeds 1-3 for Waxing and speeds 3-5 for Polishing (which it actually says on the back of the machine I just noticed!!!)
The speed adjuster is found on the base of the Polisher.
Testing/Results on my OEM Bonnet
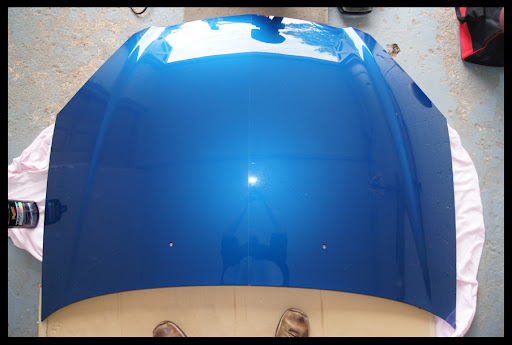
So, down to the actual testing! I decided to have a go with the G220 V2 on my OEM bonnet which has seen better days due to being covered with a cloth in the garage leaving some light swirls (don't get me wrong though, it's still pretty curse clean anyway!)
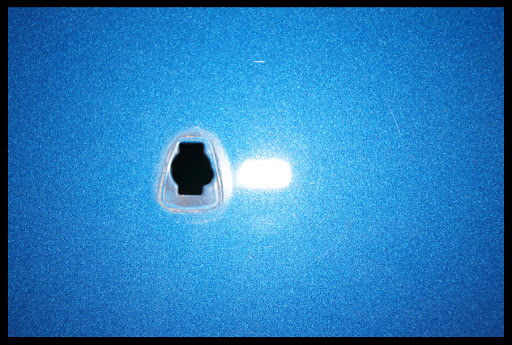
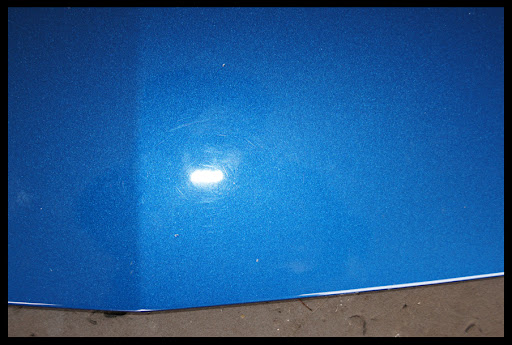
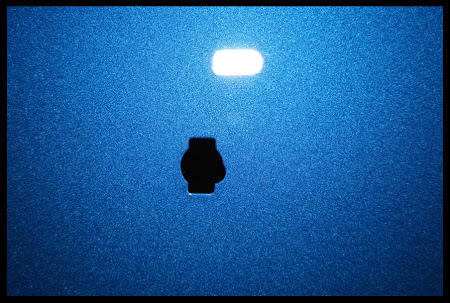
Firstly, pictures before I got to work on it, note the swirls and scratches noticeable by the cameras flash and the pretty bad defects around where the washer jet sits. Also some water spots here and there are visible.
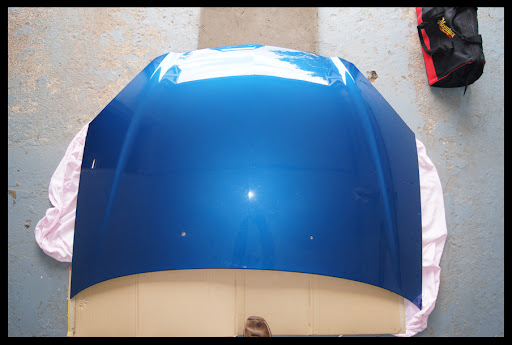
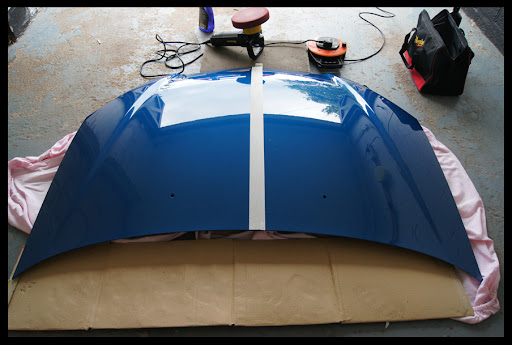
I worked on one side only (left side from the cameras perspective) and used some masking tape down the centre to seperate the bonnet into two halves so I could compare the end results.

Step 1 - Cutting Pad - Red
Depending on how bad your paintwork is, you will need to decide if you need to use a cutting pad or not, my bonnet had a small selection of scratches which warranted a cutting pad, that and I really wanted to test everything for the best result possible!
I used the cutting pad on speed 4 with some ultimate compound. You need to 'prime' the pad first with some quick/speed detailer then you apply the product in an X pattern and switch the G220 V2 on and off against the panel to avoid product splatter.
Polishing Pad - Yellow, pictured below with a photo of it being 'primed' with some quick detailer before applying the Ultimate Compound:


You then work the product into the panel, making sure the power cable doesn't touch the surface (sling it over your shoulder)
Polishing can be done in vertical, horizontal and diagonal lines which is explained in the Meguiars Detailing Guide here: http://www.itr-dc5.com/forum/index.php?/topic/22861-meguiars-official-detailing-guide/

Once that was done, I used a clean microfiber to wipe the product off.
Already it's looking good...
Step 2 - Polishing Pad - Yellow
Using exactly the same method above, I followed on with the polishing pad on the same speed setting (4) and again, wiped away the product with a clean side of the microfiber.
Step 3 - Finishing Pad - Black
Finally I got round to the finishing pad, again using the exact same method as the others but instead I switched the speed down to 2 which is the G220 V2's 'Waxing' speed range and I used some Ultimate Liquid Wax.

After product removal:

Results
Pictures speak louder than words, as you can see, pretty much every single defect has been completely removed :blink:
The paint is darker in appearance (that would be the wax doing its thing) and reflections are slightly improved (VERY slight because my bonnet was pretty clean already as said before!)
Only the worst scratches still remain and obviously Machine Polishing wont do anything for stone chips.
Before (left) After (right)

Comparison between left and right side with masking tape removed, left side is noticeably cleaner and almost completely free of scratches/swirls!
Before (left) After (right)

Conclusion
The Meguiars G220 V2 is a very handy piece of kit, basically, what has taken me years by hand, this thing can do in a few minutes and with better results!
It takes the effort out of applying waxes and will remove a slew of minor scratches with ease along with any water spots. The pads are also machine washable! Happy Days! :lol:
My only gripe is the noise, it's not as quiet as I would have hoped, but that doesn't affect how it performs! This is one serious piece of detailing equipment and one I welcome to my detailing collection.
I don't think I will do my whole car though personally, it just doesn't warrant it, those that have seen my paintwork will probably agree! But I will certainly use it to effortlessly correct any fresh scratches/defects if they arise, my carbon bonnet could actually do with a machine polishing however as the lacquer is prone to scratches!. I can see myself FULLY detailing other cars more than my own with this, friends/family especially.
I really would like to have a go on my headlights with it :lol:
If you want a show car perfect shine, I think this will give you a VIP express ticket! Depending on the condition of your paint that is, don't expect to be removing orange peel as I don't think it does.
The tip to good paintwork is a good job in the first place and maintenance is the key! Keeping things tip top for me just got a whole lot easier though with the G220 V2! If a lot louder :lol:
Although I have a horrible cold, I decided to take advantage of the situation and do this Review
What you get/What I bought
Prices vary from place to place, but what you get with the G220 V2 standard is a nice Canvas bag, Backing Plate including all the bolts and tools you need to get assembling (which is very easy to do!, literally 2 bolts for the handle)
I bought mine with the extra Cutting, Polishing and Finishing Soft Buff 2.0, 7" pads (pictured below) which were around £10 each.
What you need
Now you are going to need some cleaning products, if you are a Meguiars Whore (like myself) you are going to have some Ultimate Compound and Ultimate/NXT 2.0 Liquid Wax, if not, you need to go out and get some! Obviously you can use any other branded product with this polisher and even the professional range of cleaners/waxes (if you have otherwise)
Also use some Quick Detailer to 'prime' the pads, I explain that later... (I used speed detailer) oh and some clean microfibers to wipe the products off.
How it all works
Basically, what you are doing with a machine polisher is making things easier, that and removing defects which otherwise would be near impossible by hand. The G220 V2 is dual action, so it rotates and orbits. What this means is you have less chance of scratching your paint surface. It also has Cruise Control, a feature the DC5 could have done with :lol:
It also has variable speeds which you will need depending on the level of polishing you are doing.
The Polishing/Cutting/Finishing pads have a velcro backing, so it's really easy to apply and remove on the G220 V2's velcro backing plate, just line them up and press down. Simples!
You use the 'Dead Weight' of the machine to do the polishing, in other words, you don't need to add pressure, unless you are working vertically obviously, in which case you need just enough to keep it straight against the panel.
Handling/First Impressions
The G220 V2 isn't what I call 'light', it weighs about 6 Pounds, so it's a hefty piece of kit IMO, but very easy to hold and control with the supplied handle and the overall shape of the machine feels comfortable plus that 'dead weight' actually helps it work, thus saving you effort.
I thought it was quite loud! but then I don't like overly loud noises (I have a Kakimoto 06&R don't you know!) :lol: I would say the G220 V2 was about the volume of a small electric lawnmower on speed 4 against my test bonnet I used, speed 6 actually scared me :lol: (VTEC YO!)
Really though, you will only need between speeds 1-3 for Waxing and speeds 3-5 for Polishing (which it actually says on the back of the machine I just noticed!!!)
The speed adjuster is found on the base of the Polisher.
Testing/Results on my OEM Bonnet
So, down to the actual testing! I decided to have a go with the G220 V2 on my OEM bonnet which has seen better days due to being covered with a cloth in the garage leaving some light swirls (don't get me wrong though, it's still pretty curse clean anyway!)
Firstly, pictures before I got to work on it, note the swirls and scratches noticeable by the cameras flash and the pretty bad defects around where the washer jet sits. Also some water spots here and there are visible.
I worked on one side only (left side from the cameras perspective) and used some masking tape down the centre to seperate the bonnet into two halves so I could compare the end results.
Step 1 - Cutting Pad - Red
Depending on how bad your paintwork is, you will need to decide if you need to use a cutting pad or not, my bonnet had a small selection of scratches which warranted a cutting pad, that and I really wanted to test everything for the best result possible!
I used the cutting pad on speed 4 with some ultimate compound. You need to 'prime' the pad first with some quick/speed detailer then you apply the product in an X pattern and switch the G220 V2 on and off against the panel to avoid product splatter.
Polishing Pad - Yellow, pictured below with a photo of it being 'primed' with some quick detailer before applying the Ultimate Compound:
You then work the product into the panel, making sure the power cable doesn't touch the surface (sling it over your shoulder)
Polishing can be done in vertical, horizontal and diagonal lines which is explained in the Meguiars Detailing Guide here: http://www.itr-dc5.com/forum/index.php?/topic/22861-meguiars-official-detailing-guide/
Once that was done, I used a clean microfiber to wipe the product off.
Already it's looking good...
Step 2 - Polishing Pad - Yellow
Using exactly the same method above, I followed on with the polishing pad on the same speed setting (4) and again, wiped away the product with a clean side of the microfiber.
Step 3 - Finishing Pad - Black
Finally I got round to the finishing pad, again using the exact same method as the others but instead I switched the speed down to 2 which is the G220 V2's 'Waxing' speed range and I used some Ultimate Liquid Wax.
After product removal:
Results
Pictures speak louder than words, as you can see, pretty much every single defect has been completely removed :blink:
The paint is darker in appearance (that would be the wax doing its thing) and reflections are slightly improved (VERY slight because my bonnet was pretty clean already as said before!)
Only the worst scratches still remain and obviously Machine Polishing wont do anything for stone chips.
Before (left) After (right)
Comparison between left and right side with masking tape removed, left side is noticeably cleaner and almost completely free of scratches/swirls!
Before (left) After (right)
Conclusion
The Meguiars G220 V2 is a very handy piece of kit, basically, what has taken me years by hand, this thing can do in a few minutes and with better results!
It takes the effort out of applying waxes and will remove a slew of minor scratches with ease along with any water spots. The pads are also machine washable! Happy Days! :lol:
My only gripe is the noise, it's not as quiet as I would have hoped, but that doesn't affect how it performs! This is one serious piece of detailing equipment and one I welcome to my detailing collection.
I don't think I will do my whole car though personally, it just doesn't warrant it, those that have seen my paintwork will probably agree! But I will certainly use it to effortlessly correct any fresh scratches/defects if they arise, my carbon bonnet could actually do with a machine polishing however as the lacquer is prone to scratches!. I can see myself FULLY detailing other cars more than my own with this, friends/family especially.
I really would like to have a go on my headlights with it :lol:
If you want a show car perfect shine, I think this will give you a VIP express ticket! Depending on the condition of your paint that is, don't expect to be removing orange peel as I don't think it does.
The tip to good paintwork is a good job in the first place and maintenance is the key! Keeping things tip top for me just got a whole lot easier though with the G220 V2! If a lot louder :lol: